by cameron | Mar 25, 2014 | Apple, Evernote, Hazel, Mac, technology
I’ve got an old scanner (Canon MP250) and I wanted a way of automating the process of scanning documents and getting them into Evernote.
There’s probably a way of doing this all in
Keyboard Maestro, but I couldn’t work it out quickly enough. It’s my first time using KM and I’m still a little confused by it. But I know my way around
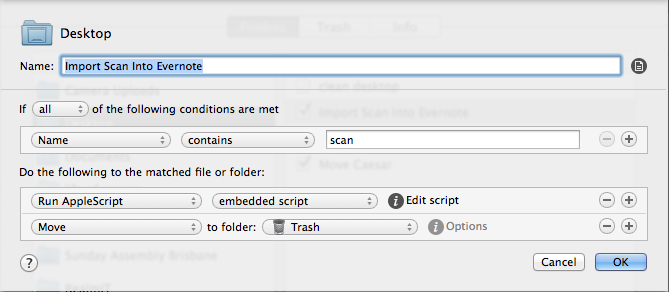
Hazel and I used
this Applescript from Macworld as a cheat.
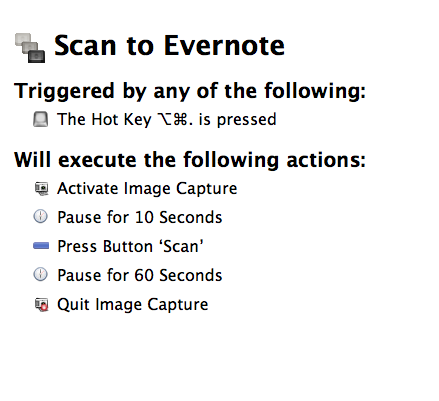
So, when I hit my hot key, KM opens up Image Capture, scans the document and puts it on my desktop where Hazel picks it up and imports it into my “!Inbox” notebook in Evernote where I can process it later, and then deletes the file from my desktop. KM then waits a minute and kills the Image Capture app.
Keyboard Maestro

Hazel
Hazel AppleScript
tell application “Evernote”
activate
create note from file theFile notebook {“!Inbox”} tags {“scan”}
end tell
by cameron | Dec 2, 2013 | Evernote
Last week I attended the Brisbane Evernote User Group (BEUG for short) and we were very fortunate to have Troy Malone from Evernote HQ (General Manager, Asia Pacific) join us over Skype for a chat about he uses their product in his daily life. How cool is that? It was pretty late his time too (midnight I think), so you have to hand it to Evernoters for evganelising.
I asked Troy what tool he recommends for clipping content from iOS apps into Evernote and he introduced me to the Lightly app made by Ignition Soft, the same company that makes Everclip, one of my other favourite iOS apps. So that was a win. (FWIW – Lightly is great for copying certain lines of text from a page you’re reading on your browser into Evernote, but I prefer Everclip for copying content out of other apps, like iBooks, etc).
Afterwards, Troy said the only thing he hasn’t figured out yet is how to get Facebook posts into Evernote. I said “I can do that!”
It wasn’t easy, but I nutted it out a few weeks ago when my wife, Chrissy, announced she was pregnant on Facebook. I thought it would be nice to save that for the baby book – and of course, the natural place for it is in Evernote.
So if anyone else is trying to work out how to clip a Facebook post (and its comments) into Evernote, here’s how I do it.
How To Clip A Facebook Post Into Evernote
STEP 1.
Open up the post you want to save. Facebook will open it in “Theater mode” – which is nice to look at, but annoying to try to clip into Evernote. Select the URL in the address bar and copy it.

Step 2.
Post that bad boy into a new tab. The resulting page should look like this:

Step 3.
Expand all of the comments (if you want them to end up in Evernote).

Step 4.
Cick your good ol’ Evernote Web Clipper, select “Full Page” and “Save”.

Step 5.
Hey presto! Once you have synchronized Evernote, you’re post will look just like it did in Facebook!

I hope that helps some of you to get more out of Evernote!
by Cameron Reilly
by cameron | Oct 22, 2013 | Mac, technology

For the six years I’ve been using a Mac, I’ve often wanted to learn how to use AppleScript to automate processes I repeat. Today I finally did.
As part of my routine for keeping my Mac running efficiently, I like to re-boot it every couple of days. And to make sure it continues to boot quickly, I’ve made sure I’ve deleted everything that wants to auto-startup at boot. That way, I get a nice, clean, quick boot if I need it.
However, there are also a number of sites and apps that I use all day that I need to run. So instead of opening them all up individually after a new boot, I’ve written an AppleScript to do it for me.
Now if you’re an old AppleScript hand, this is probably stupidly simple. But I know lots of friends and family who have moved to a Mac in recent years and who aren’t programmers, so this is for them.
The Steps.
1. Open AppleScript. It comes pre-installed on your Mac. Find it by searching Spotlight.
2. Start a new script.
3. Cut & Paste my code from below. Change the URLs you want to open and the App you want to run according to your tastes.
4. Click “Compile” on the AppleScript toolbar.
5. Flie > Save. Save it to your Applications folder. Make sure the “File Format” is “Application”. Call it whatever you want – mine is just called ‘Startup’.
6. Lastly, open up the Applications folder and drage the icon for the new app to your dock. Close AppleScript.
Now, when you boot, after the dock loads, just run the new app and it will open all of your sites and apps for you.
open location “http://gmail.com”
open location “http://facebook.com”
tell application “TextExpander”
activate
end tell
tell application “Alfred 2”
activate
end tell
tell application “CrashPlan”
activate
end tell
tell application “PopClip”
activate
end tell
tell application “Bartender”
activate
end tell
tell application “Fantastical”
activate
end tell
tell application “Moom”
activate
end tell
tell application “Skype”
activate
end tell
tell application “TweetDeck”
activate
end tell
tell application “Evernote”
activate
end tell
tell application “Spotify”
activate
end tell
by cameron | Oct 17, 2013 | iPad, technology
If you are struggling to follow Wired’s 2010 instructions because you can’t find a copy of “Stanza Book Restore Tool”, then look no further.
With thanks to @bitfield, I have a copy that I’m going to leave here. You’re welcome.

by cameron | Sep 10, 2013 | technology
I’ve been under a brute force attack on my server recently and have to look up way too many IP addresses in Project Honeypot and WHOIS to see if they are known spammers, so I built this Alfred workflow (my first!) to speed up the process.
Download